Simple-trigger Usage Example
Related pages:
Simple-trigger
Simple-trigger Technical Notes
Overview
The Simple Trigger component allows you to initiate and control a flow based on a specific schedule. In scenarios where your existing component lacks a trigger function, the Simple Trigger component can be seamlessly integrated to act as the initiating step. This guide provides an in-depth usage example to illustrate how to set up a flow using the Simple Trigger component.
Usage Example
Let’s consider a practical use case involving an online store that specializes in laptop sales. All laptop-related data is stored and updated locally. A promotional sale is scheduled to commence on July 24, 2023, at 7 am UTC. The objective is to retrieve the information about available laptops from the local storage and update the online store’s data via an API call. The flow should run every hour, every day, for the 40-day duration of the promotional sale.
Flow Architecture
Below is an overview of the flow’s architecture:
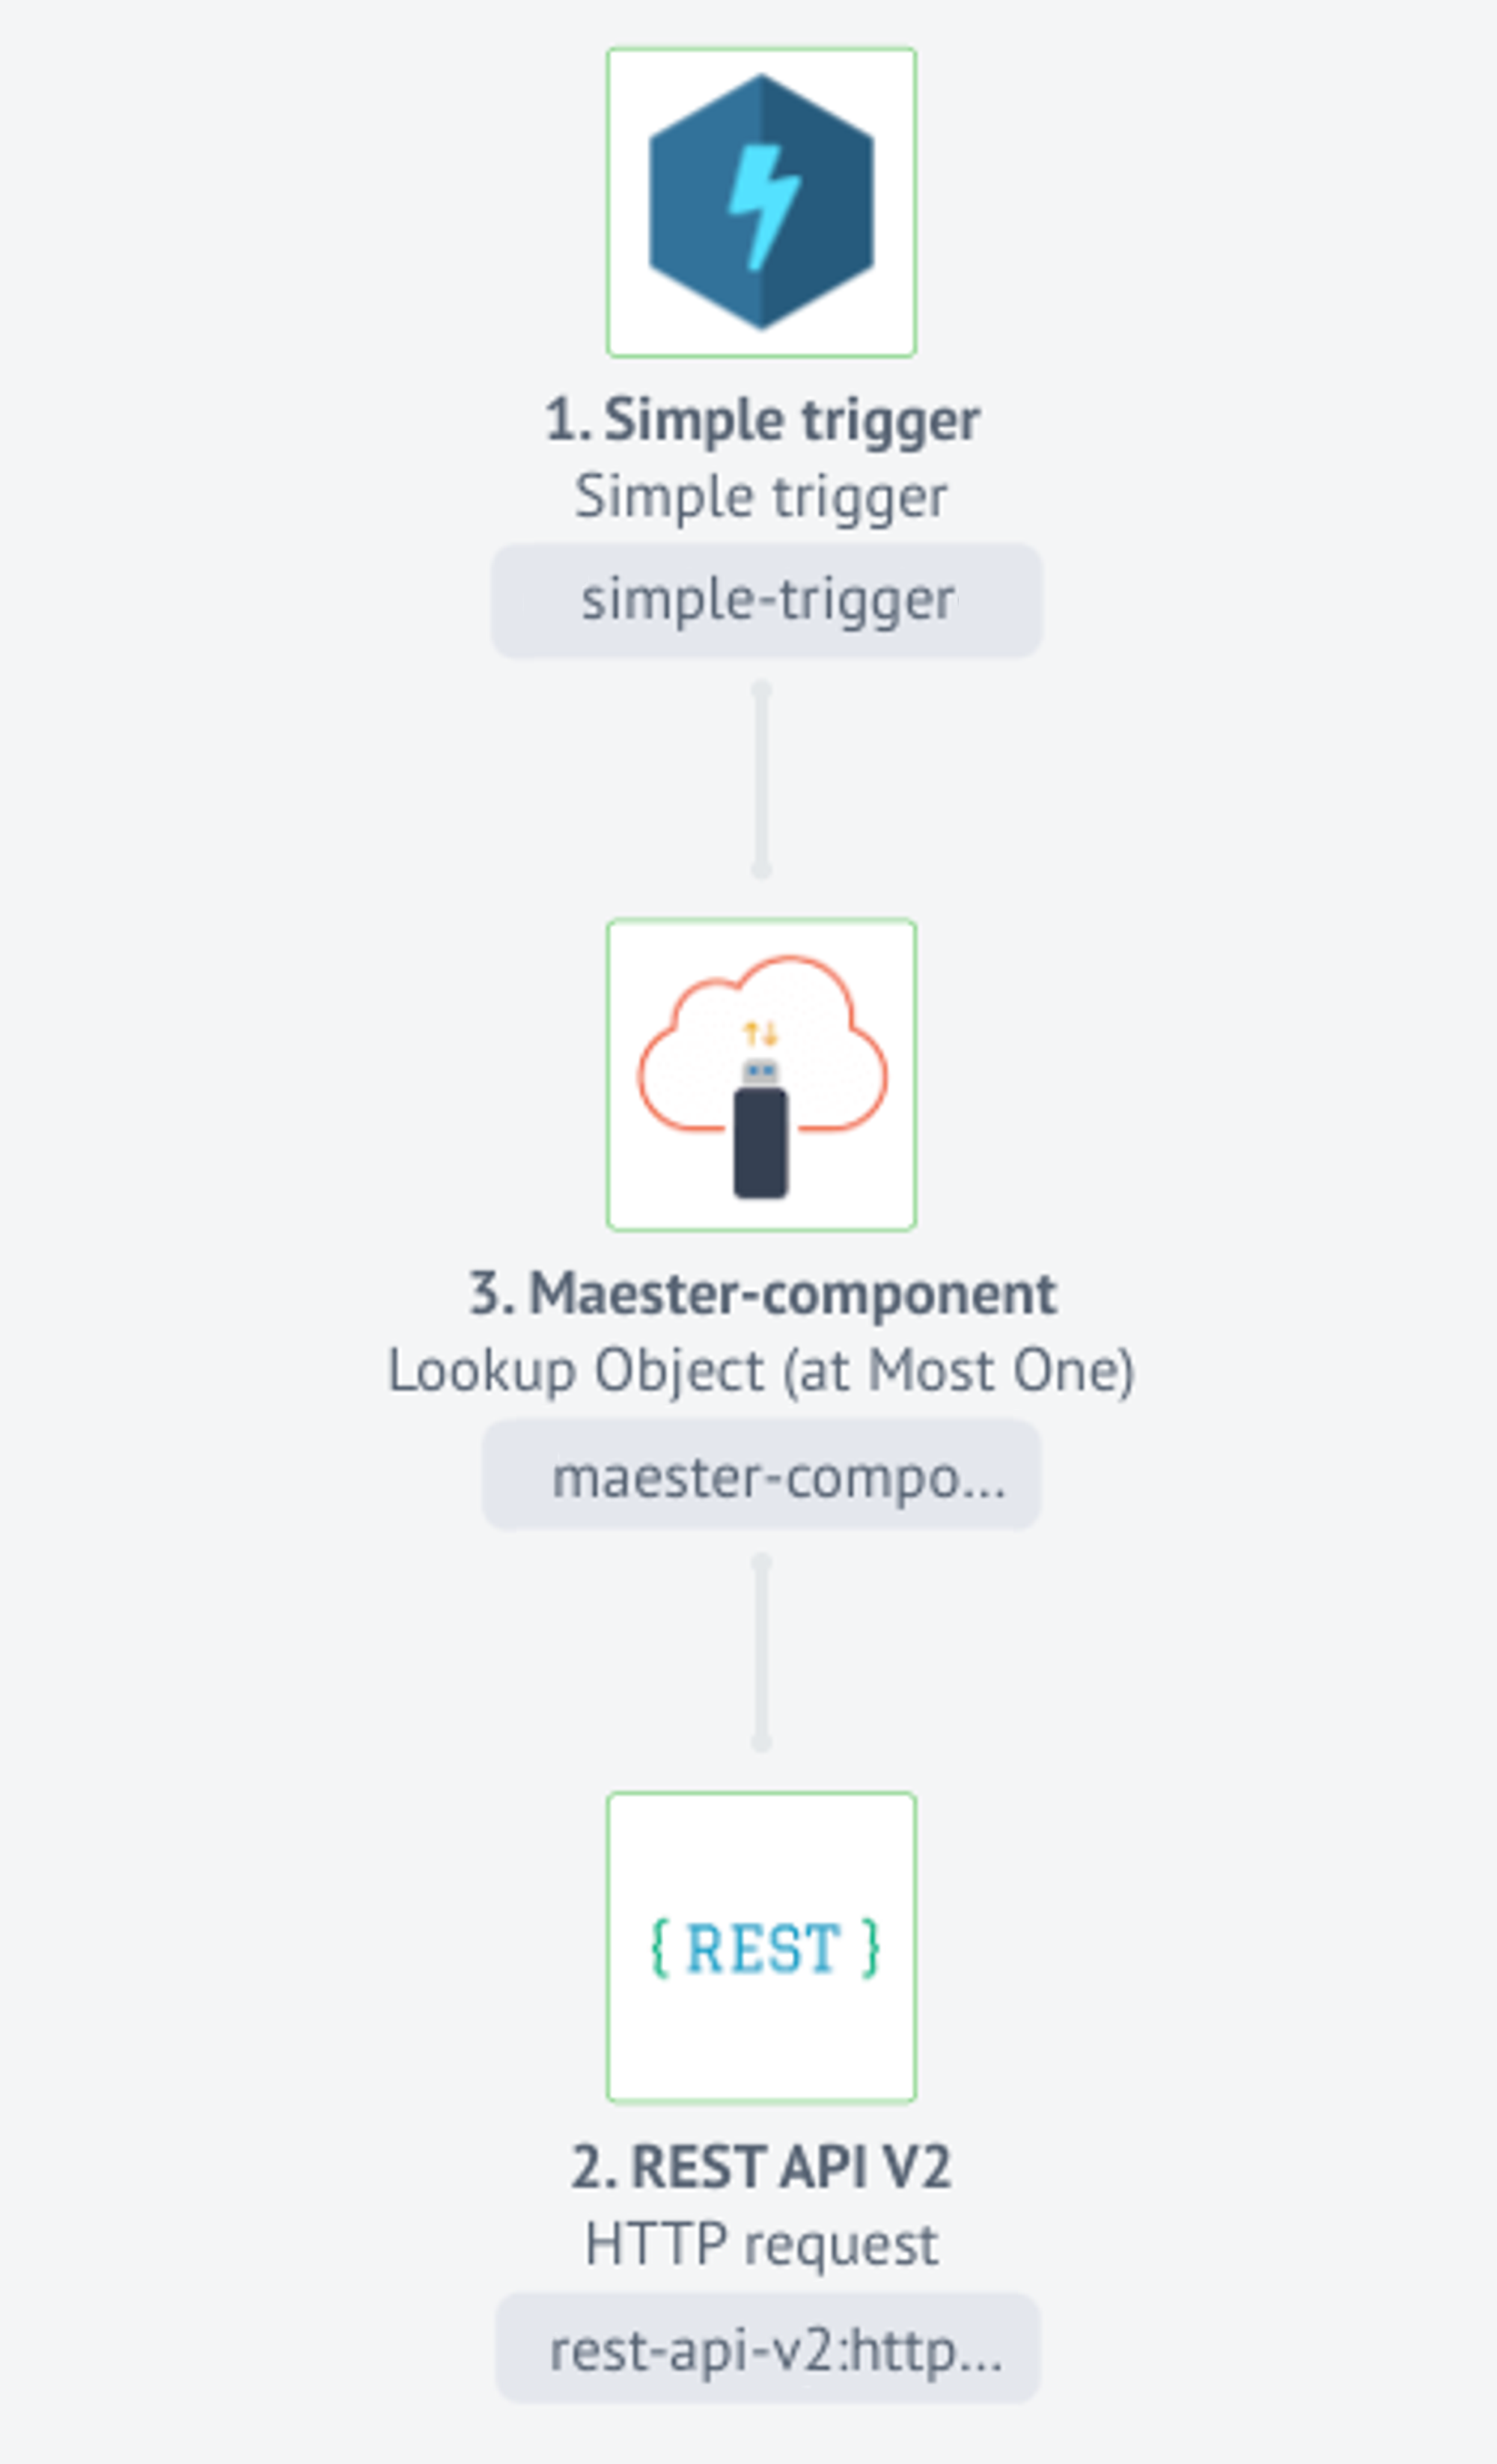
Step 1: Simple Trigger Component Configuration
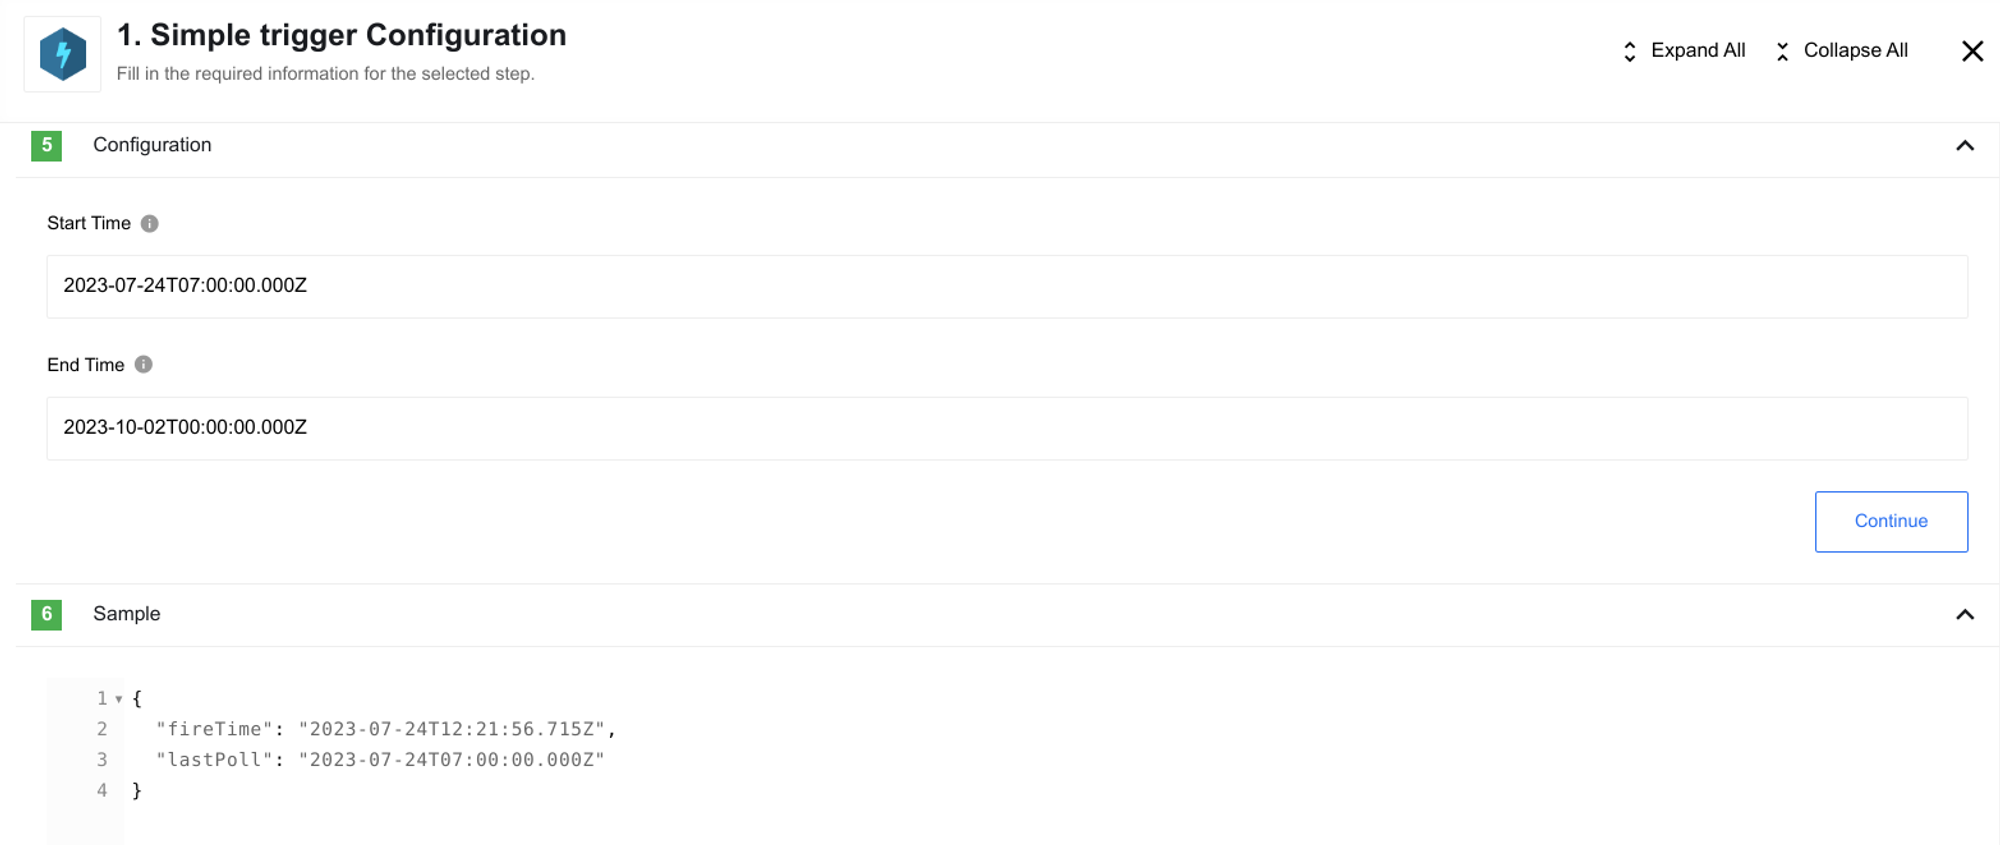
The first step of the flow involves configuring the Simple Trigger component. As we intend to initiate the flow in a specific month, we will define the configuration parameters accordingly. Set the Start Time to 7 am UTC on July 24, 2023, and the End Time to October 2, 2023, at 12 am UTC.
Step 2: Maester Component Integration
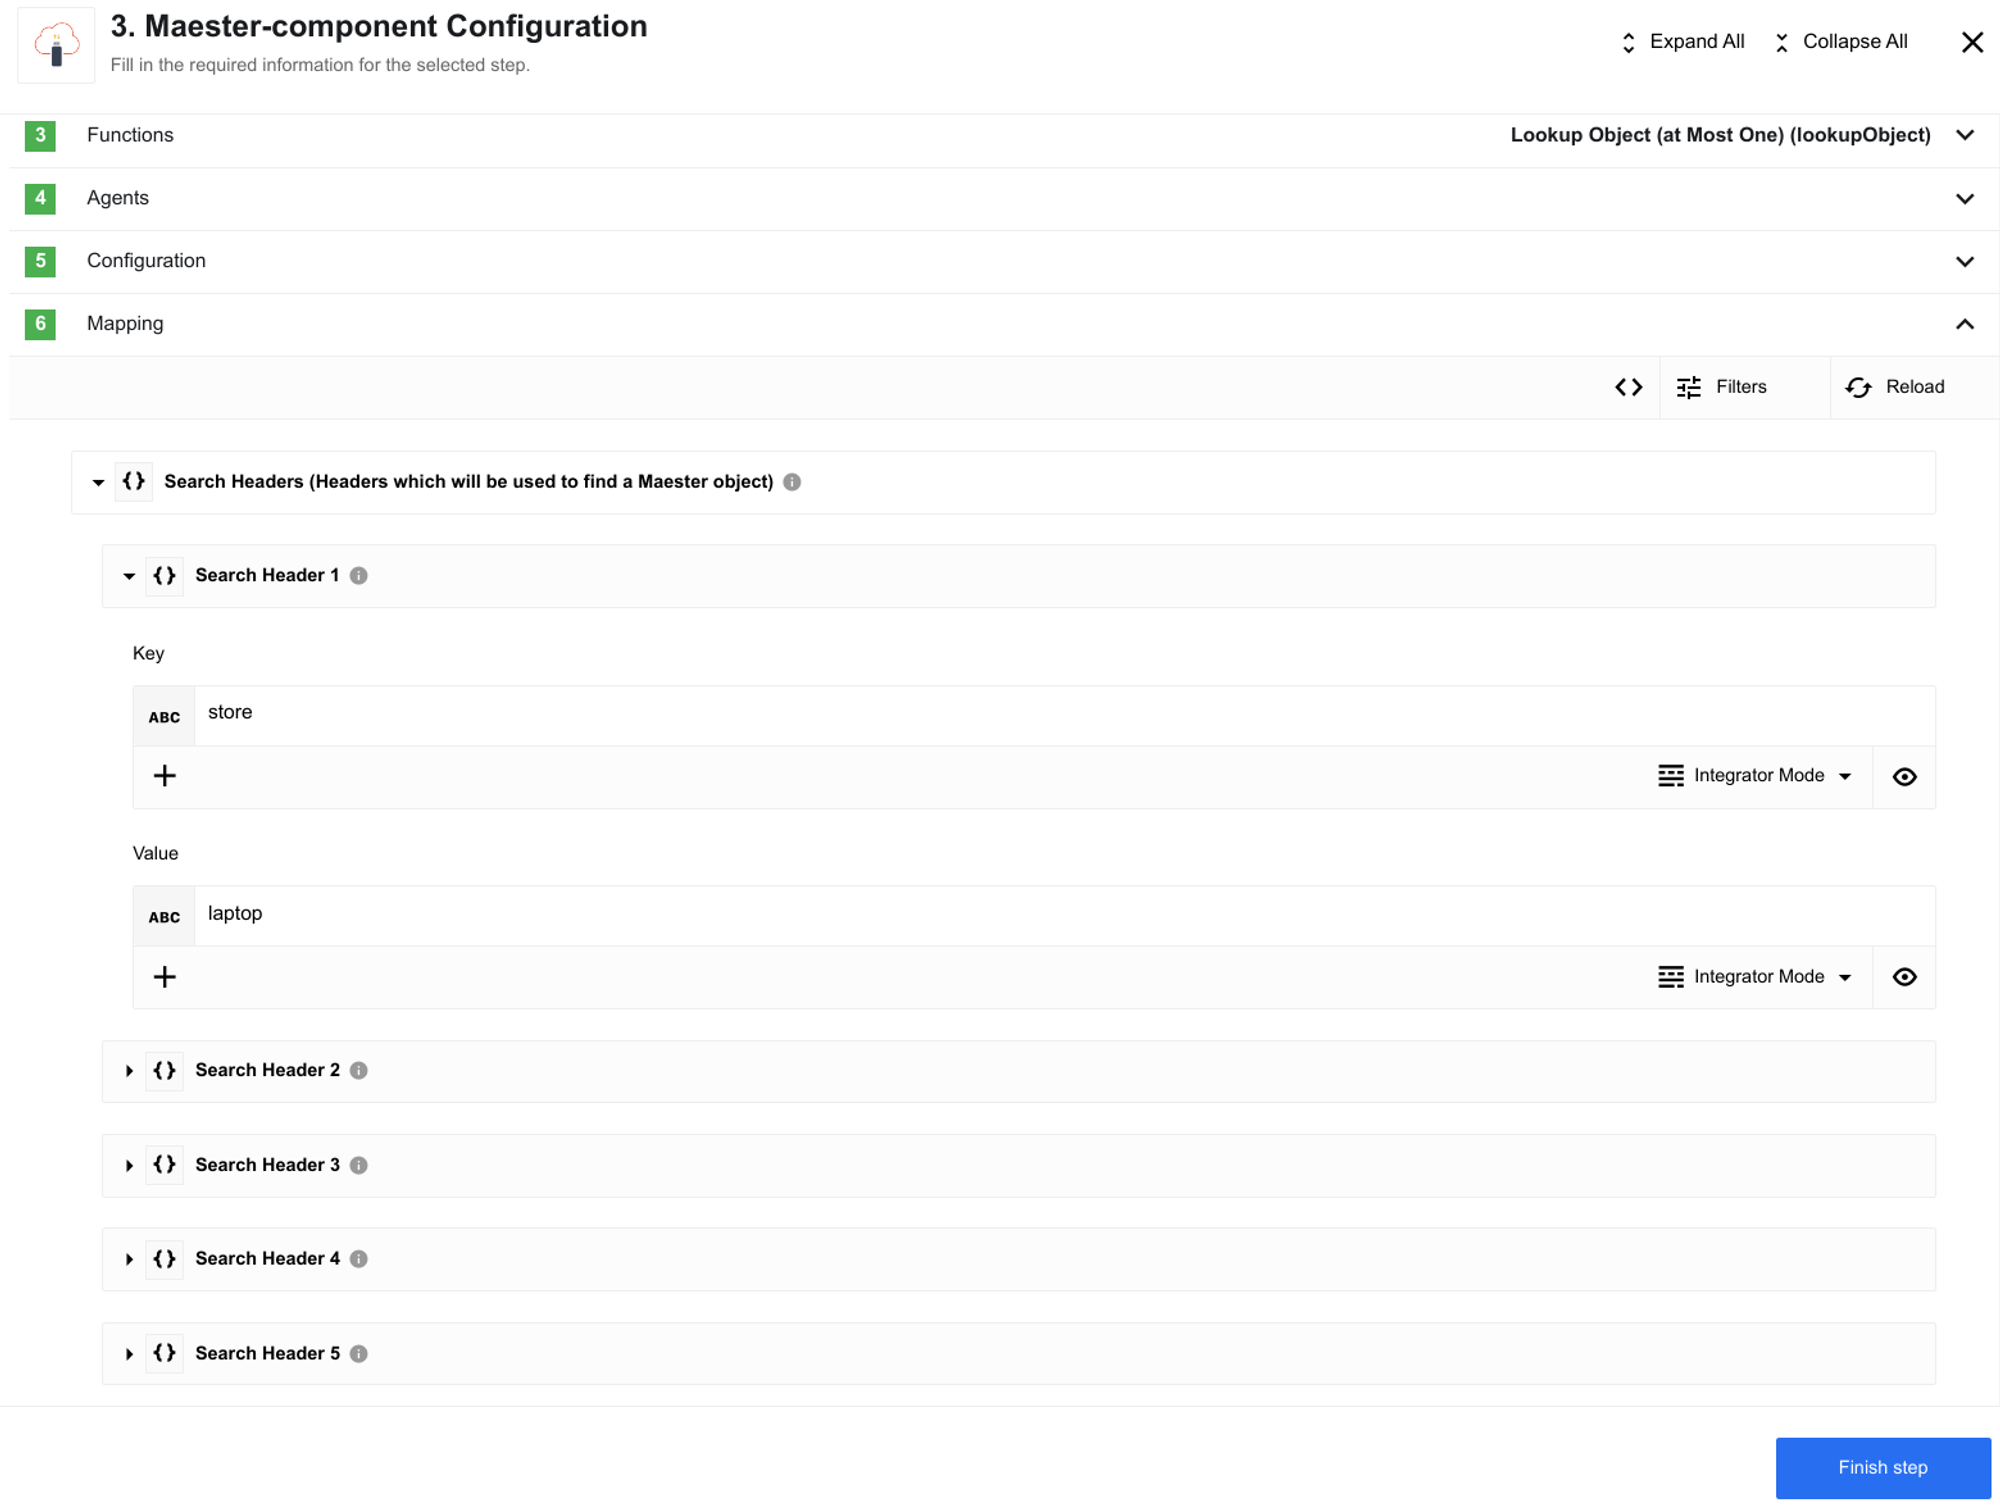
The second step incorporates the Maester component, which lacks trigger functions. In this scenario, the Maester component serves as the local storage. By utilizing the Lookup Object (at Most One) action, we can retrieve information about available laptops. The search headers act as the criteria for the search.
Maester Component Sample Example
{
  "data": {
    "name": "Apple MacBook Pro 16",
    "data": {
      "year": 2019,
      "price": 1849.99,
      "CPU model": "Intel Core i9",
      "Hard disk size": "1 TB"
    }
  },
  "maesterObjectId": "9a81dd06-ebcf-4f89-9c77-db59ec03a612",
  "metaHeaders": [],
  "searchHeaders": [
    {
      "key": "store",
      "value": "laptop"
    }
  ]
}
Step 3: REST API v2 Component Integration
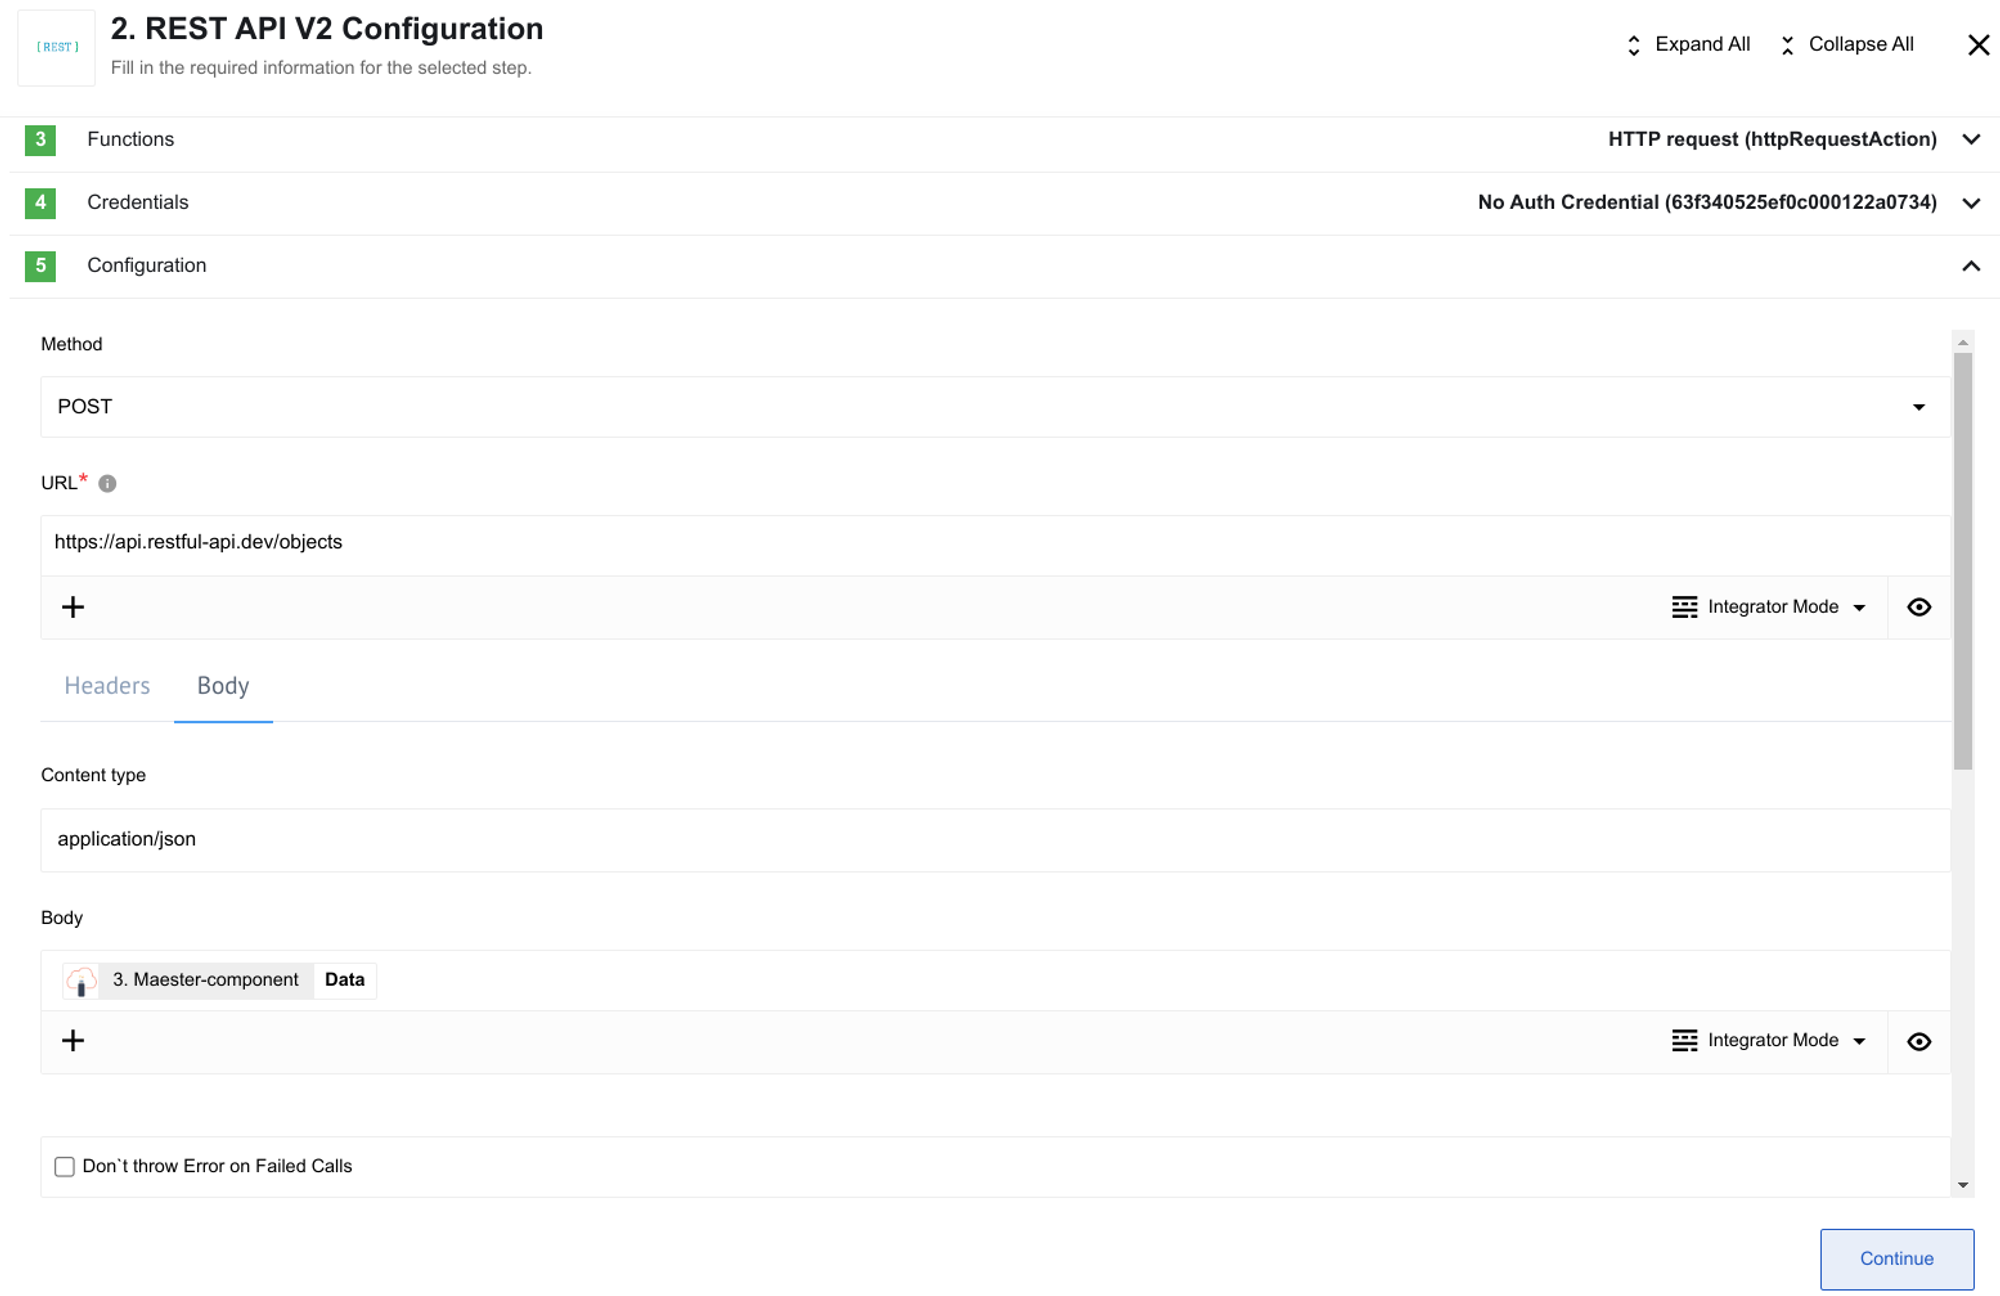
In the third step, the REST API v2 component is employed to transmit the laptop information obtained in the previous step. The output yields a generated identifier assigned to the laptop by the online store.
REST API v2 Sample Example
{
  "headers": {
    "date": "Mon, 24 Jul 2023 13:02:10 GMT",
    "content-type": "application/json",
    "transfer-encoding": "chunked",
    "connection": "keep-alive",
    "vary": "Origin, Access-Control-Request-Method, Access-Control-Request-Headers",
    "cf-cache-status": "DYNAMIC",
    "report-to": "{\"endpoints\":[{\"url\":\"https:\\/\\/a.nel.cloudflare.com\\/report\\/v3?s=RTkwPGpCofMi8%2BfFFDZ7TjL0uV81axjhjgFOzjP8ULDD4H99vNFtf6QUpvdSgdSo15eTmphx1tAkgLppw9%2F3fe8RPMoGTkab5x3FNxrk2rtFikGpYKtmdZTy1JbrL1AWc4njEg7K\"}],\"group\":\"cf-nel\",\"max_age\":604800}",
    "nel": "{\"success_fraction\":0,\"report_to\":\"cf-nel\",\"max_age\":604800}",
    "server": "cloudflare",
    "cf-ray": "7ebc5b222fad4db6-FRA",
    "content-encoding": "gzip",
    "alt-svc": "h3=\":443\"; ma=86400"
  },
  "body": {
    "id": "ff8081818977cf54018987fe33281161",
    "name": "Apple MacBook Pro 16",
    "createdAt": "2023-07-24T13:02:10.729+00:00",
    "data": {
      "year": 2019,
      "price": 1849.99,
      "CPU model": "Intel Core i9",
      "Hard disk size": "1 TB"
    }
  },
  "statusCode": 200,
  "statusMessage": "OK"
}
Scheduling the Flow
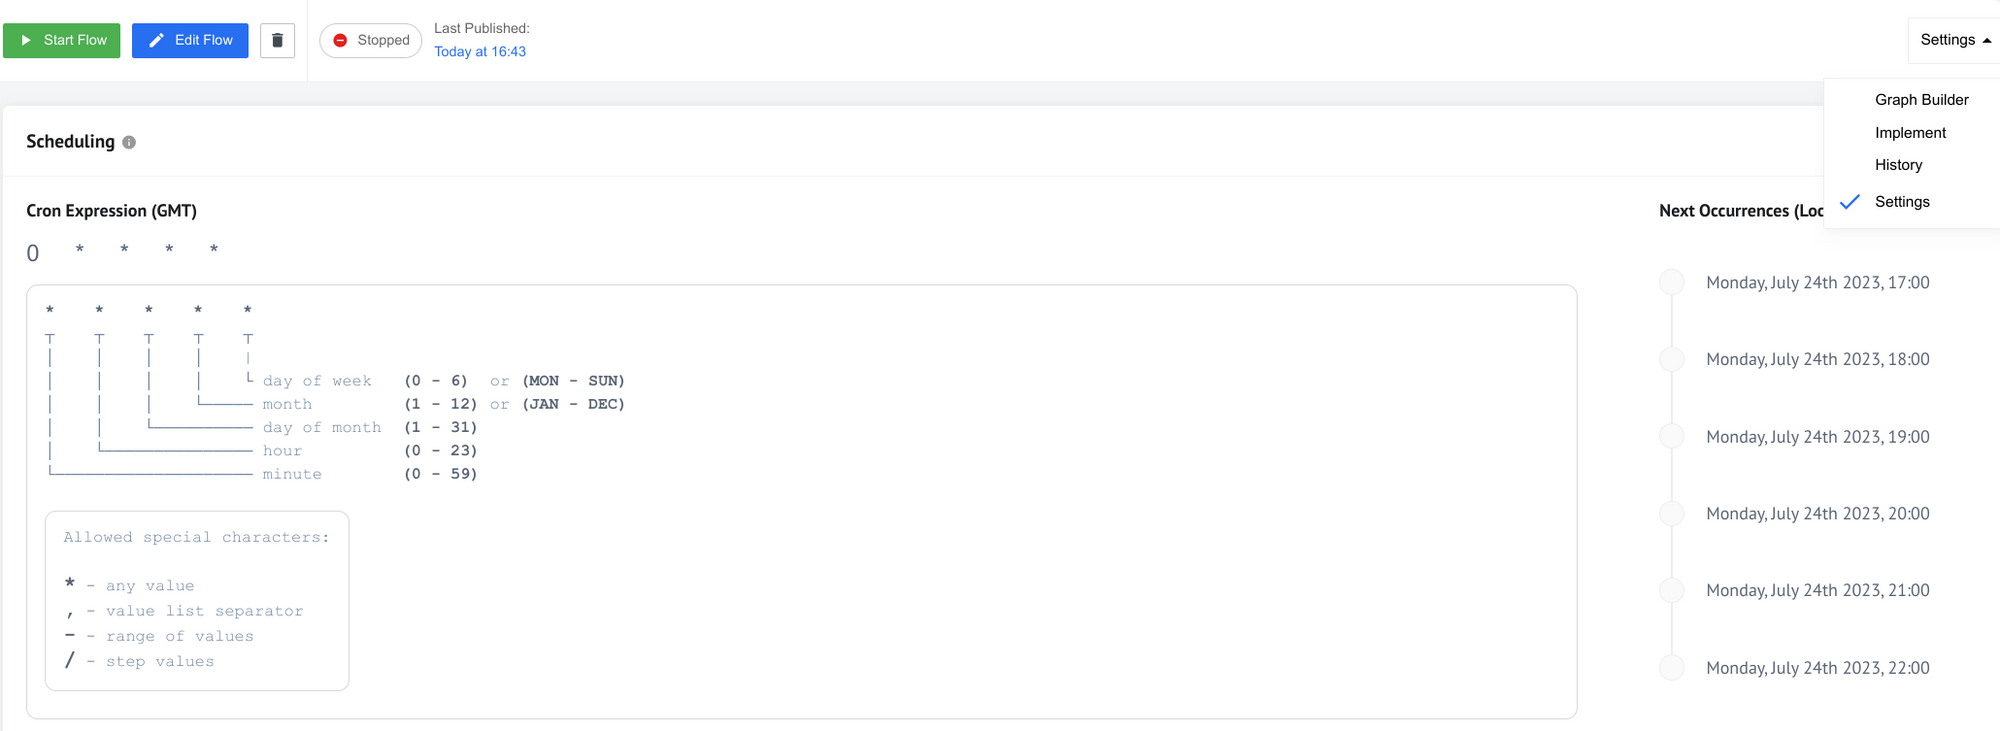
To automate the process, a schedule must be configured. Click on the settings tab located in the upper right corner and enter the desired cron expression. It’s important to note that the flow will only emit messages between the specified start and end dates. Outside this time frame, the flow will be triggered, but no messages will be processed.
Conclusion
By implementing this configuration, the flow seamlessly automates the update of available laptops for the duration of the promotional sale. The Simple Trigger component acts as a precise scheduler, ensuring that the desired actions are executed at the right times, allowing your business processes to operate efficiently without manual intervention.