Creating and managing Recipes
This document provides information on how to create a recipe, and how to use them.
The Recipe is a set of flows templates that on activation will create a single Recipe Deployment which includes a set of flows based on templates.
Create Recipe - Flows Export
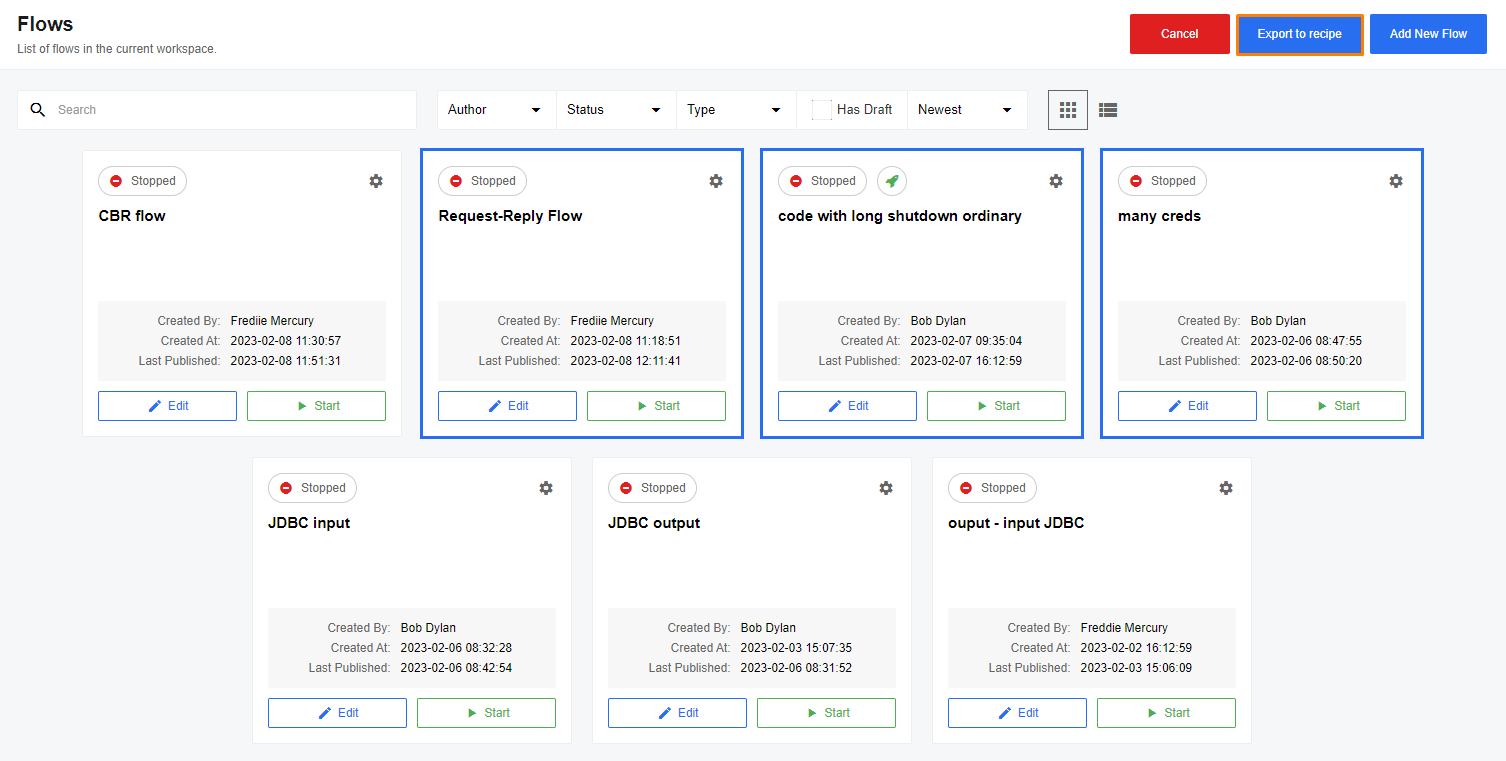
Open the Flows page. Click on the Exports button in the upper right corner (1). Choose the “Export to a Recipe” menu item (2):

The multi-select mode will be enabled and you can choose other flows which will be a part of the Recipe. Then click the “Export to recipe” button in the top right corner.

Export to a new Recipe
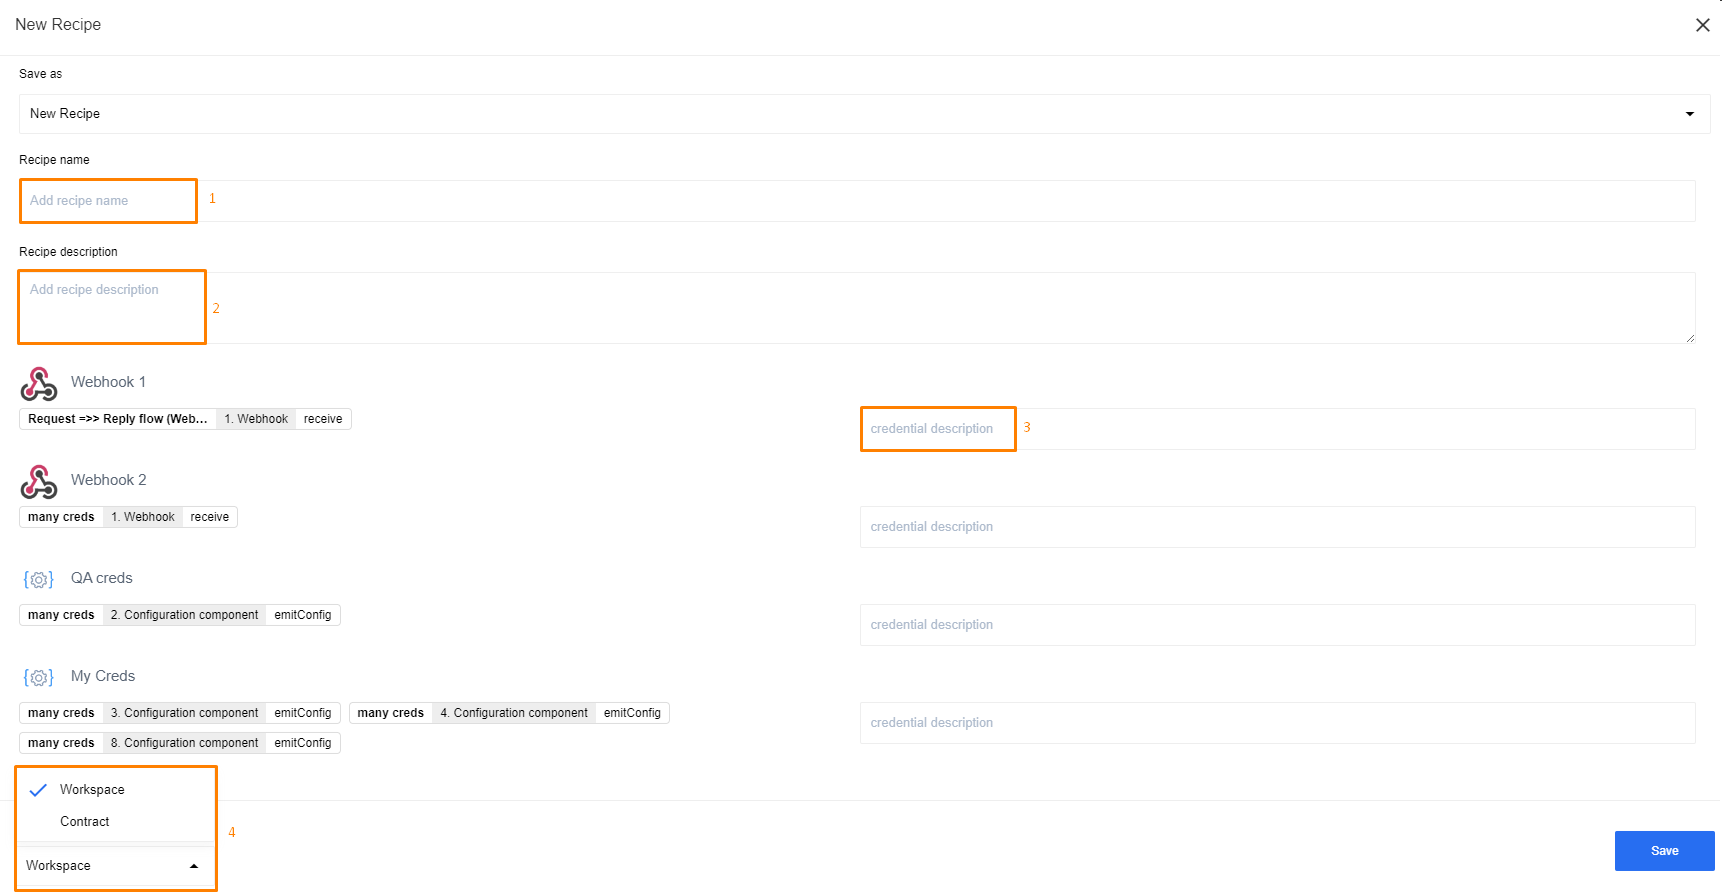
By default, you will be suggested to create a new Recipe. Enter its name (1), description(2) (supports Markdown), and description of its credentials(3).
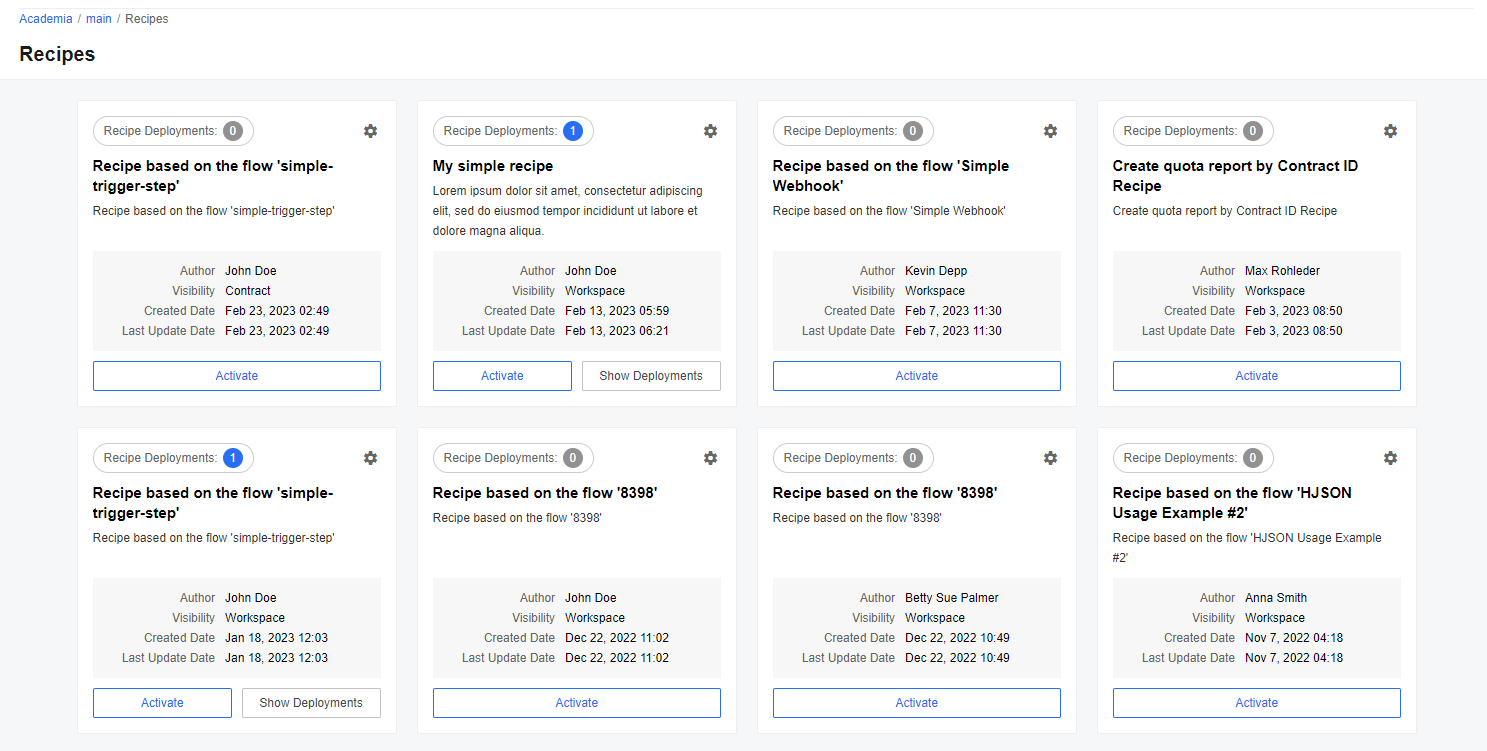
You can also change its visibility(4). On Save, you will be redirected to the newly created Recipe:

Export to an existing Recipe
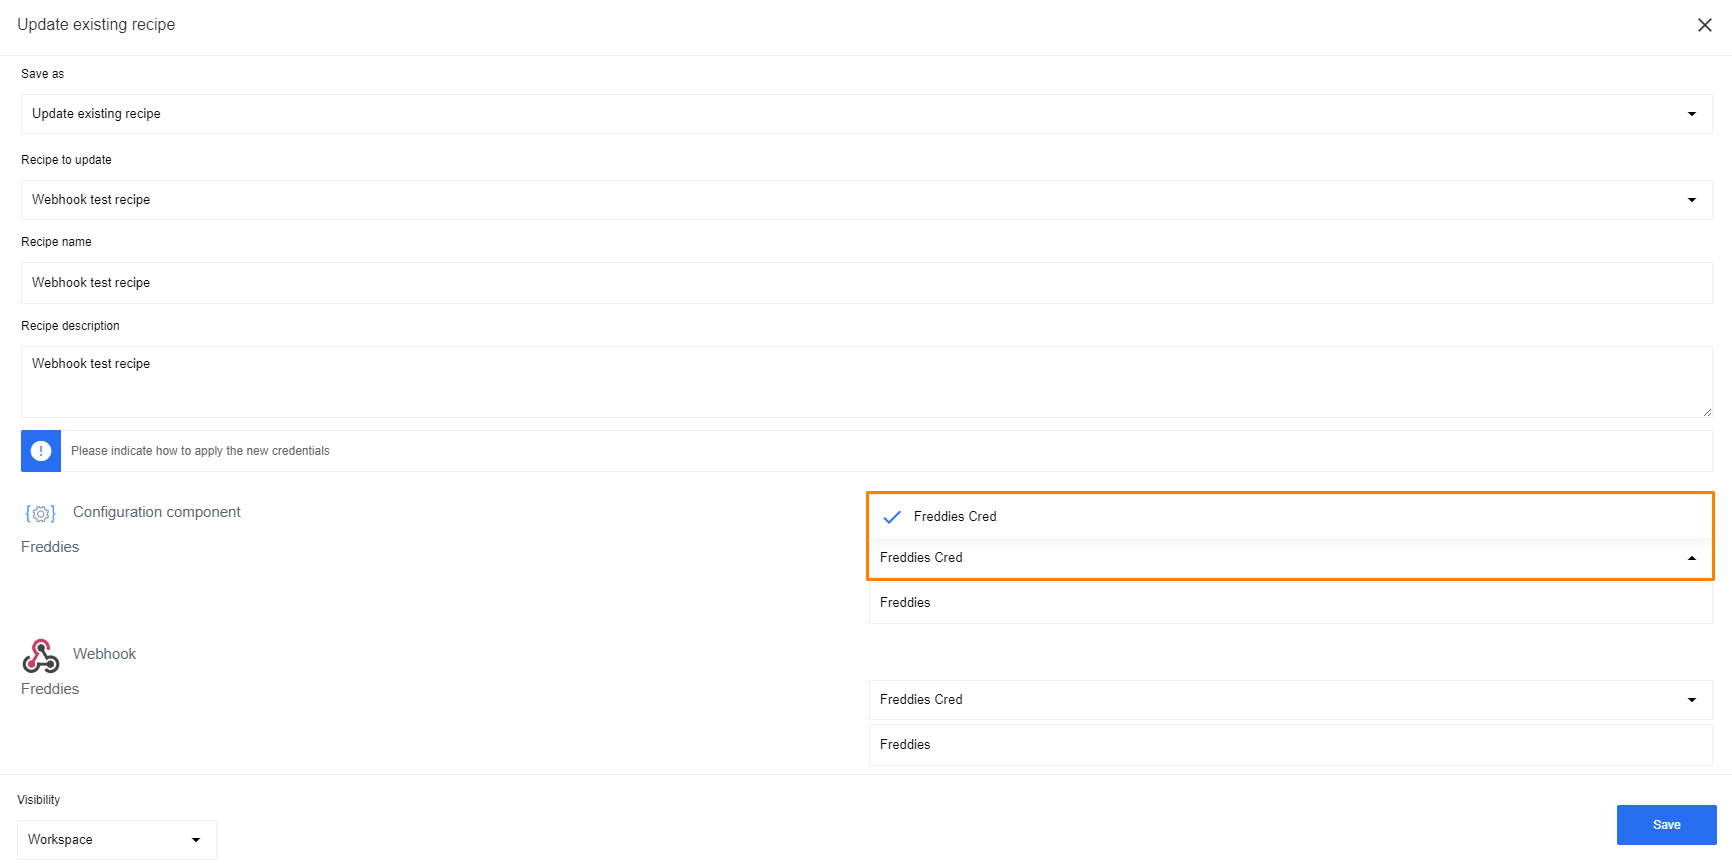
The “Save as” dropdown allows you to choose “Update existing recipe”. In this case, you will be able to choose an existing Recipe to update:

The rest of the form is the same except for the credentials mapping block:

Create and manage recipes with API
You can create and manage recipes not only through our platform, but also directly through API endpoints. You can find all information on this subject in our API Docs.
Viewing and Activating Recipes
Once you have created one or more recipes, you can easily access them in the dedicated section of our platform.

From there, you have the ability to activate the recipes as needed. By leveraging these already created recipes, you can quickly set up flows based on their predefined configurations. Follow the steps below to activate a recipe and create corresponding flows:
- Access the list of available recipes.
- Choose the desired recipe that suits your requirements.
- Activate the chosen recipe.
- Perform a simple configuration to tailor the recipe to your specific needs.
- Once activated, the recipe will generate the necessary flows based on its predefined settings.
By utilizing existing recipes, you can expedite the process of creating flows while benefiting from the expertise and best practices embedded within the chosen recipe. It’s important to keep in mind that when activating a recipe, you will need to configure credentials for each component involved in the recipe flow.

Please Note: When activating a recipe based on a flow with topics, please follow the steps mentioned above. However, it’s crucial to be aware of an important distinction between recipes with topics and those without. Recipes that utilize topics can only be activated within a single workspace.
Deleting Recipes
In addition to managing and activating recipes, you also have the option to delete any recipe when necessary. To delete a recipe, follow these steps:
- Locate the recipe you wish to delete.
- Click on the gear icon located in the top-right corner of the recipe.
- From the dropdown menu that appears, select the “Delete Recipe” option.

By following these steps, you can easily remove unwanted recipes from your collection.
Please Note: Deleting Recipes with
contract,tenant, andglobalvisibility is forbidden. To perform these actions, contact your administration.
Visibility
The Recipe can have 4 visibility levels:
- Workspace. The Recipe is visible only to those who have an access to the workspace where it was created.
- Contract. The Recipe is visible to every member of the workspace which is part of the contract where it was created.
- Tenant. The Recipe is visible to any user of the tenant where it was created.
- Global. The Recipe is visible throughout the platform.
To change the visibility, use this API endpoint.
Credentials
The Recipe can contain a list of credentials that a user must fill in during its activation. Each credential will contain a description, which you need to provide, and will be visible to the user to better understand the purpose of the credential.
Mapping
On the Recipe update, it’s forbidden to change the number of credentials that the user must fill in. During the update, you need to set a match between old credentials that all users filled in on activation of the previous version and credentials in the new set of flows. This process is called “mapping”. E.g. version 1 of the Recipe had 2 credentials:
- flow 1 - step 1 (input, JDBC component)
- flow 1 - step 5 (output, JDBC component)
You decided to split the flow into 2 flows, one for input and another for output. You create a new set of flows. Now credentials look like this:
- flow 1 - step 1 (input, JDBC component)
- flow 2 - step 3 (output, JDBC component)
You do the export into an existing recipe of version 1. During the update, you will be asked to make a match between credentials #1 and #2 of version 1 of the recipe and credentials #1 and #2 of the new version of the recipe. The match in your case should look like this:
- flow 1 - step 1 (input, JDBC component) → flow 1 - step 1 (input, JDBC component)
- flow 1 - step 5 (output, JDBC component) → flow 2 - step 3 (output, JDBC component)
The reason for this mechanism is that we don’t want to ask the user of the Recipe Deployment to re-enter the credentials on the version update. And we can’t do the match automatically.